well it's that time again, I can't believe that a month has gone since I posted the last one. This time it is a page for our children/grandchildren, or siblings. It's a page with a pocket and lots of tags, you can add more tags if you want to.

So let's get down to it.
Founation Page
Instructions for creating a foundation page:
Each month you will need to make a foundation page. For this you will need two black sheets of cardstock.
Cut one to 8 ½ x11 inches- set it aside. Cut your second one to 9 ½ x 11 inches. Please keep the left over bits as you will need them later on.


Please note, I am only
human and do make mistakes, I have taken every care while writing the
instructions, and hope they make sense. It is quite hard to write instructions
as I know what I mean; but this does not always translate into the
instructions. If you are unable to work something out, then please ask a
question in the comments box at the end of the post and I will answer it for
you as best I can. Or email me at jane@seriouslyscrapbooking.net.au
Materials List
Little Darlings Collection2x Lullaby 1x Little Treasures 1 x Baby Borders
1 x New Arrival 1/2 x Rock-A-Bye 1/2x Cherished
Once upon a Springtime Die Cut Frames
3x Black Cardstock and 2 Yellow, + 1 of each of Pink and blue cardstock
Imaginarium Designs Chipboard – IDC0002 Swirl corners.
White Brads and assorted Ribbons
Color Box Fluid Chalk-chestnut roan, 3L 12x12 Adhesive sheets Wet Glue


Once you have cut all four sides, you can cut across each corner and remove the middle of your print paper. Do this to each print paper. The middle bit is what we will be using for our pages. Separate the corners from the borders.


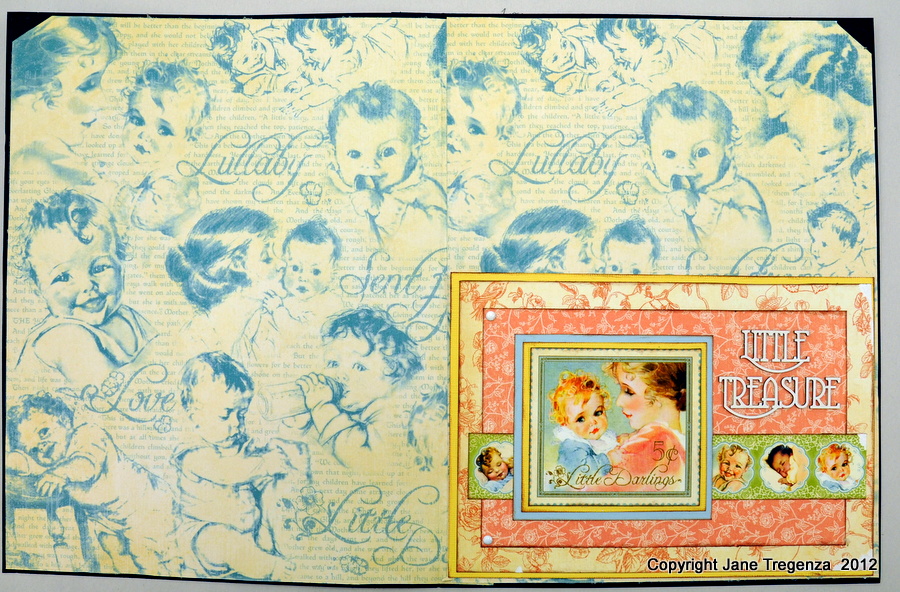
Now we need to place our pocket onto our page. It is to be a pocket with the left and top edge not attached to your page. You will need to put tape on your founation page, so the pocket is attached to the page on the right and bottom side and corner of your page only. Use the photo as a guide. Please don’t worry about the right side of your page yet!


Now you can adhere your border at the top of your page. Start in the left corner. Adhere your border and run it over the join in the middle of your page. Go over the fold in the middle of your page for about an inch. Place the other border on your page and trim it to fit. It needs to go over the top of the first border and finish near the fold in the middle of your page. It must not go over the fold. Once you have it trimmed, you can adhered it to your page.


Your page should now look
like this. All the borders on and corners gluded on as well.

Find your piece of “New Arrival” that is two stamps wide and 6 stamps high. Mat it onto a piece of blue cardstock. Adhere it to your page.
Find your piece of “New Arrival” that is 6 stamps wide and 3 stamps high. Turn it over and adhere it to your page.


Tags Tutorial - Page 3
By
Jane Tregenza
All artwork,
images, instructions and design are copyrighted 2012
Instructions for creating the Tags.
Please follow my instructions carefully, as you will need
all the left over bits of your print paper. Remember to ink the edges of all the following pieces, except the
black cardstock. Please note that I have not added any names, dates for any
information to my tags. You will need to add your own personal details for each
child to each tag.
1st Tag

Front side
From your blue cardstock, cut a rectangle 4 ½ inches x 7 ½
inches. Corner round all four corners, using a punch. Cut a rectangle from your
spare “New Arrival” print paper. It needs to be 4 ¼ inches
x 7 ¼ inches, corner
round all the corners as well. Ink around the edges and adhere it to your blue
cardstock tag.


From your “Baby Border” sheet of print paper, find the piece
that has the blue kewpie dolls on it, cut it so it is about 9 inches long. Adhere it to your page about 1 ¼ inches up
from the bottom of your tag and wrap the ends around to the back of your tag;
they should nearly met in the middle on the back of your tag. Cut a black mat 3
¾ inches x 6 inches out of black and adhere it to your tag. Add a photo and title to finish your tag.

Choose an image from your “New Arrival” print paper. Cut a
yellow mat 3 ½ inches wide and 3 ¼ inches high. Adhere your image to your
yellow mat, don’t adhere it to your tag yet. Cut a black mat 3 ½ inches wide and
3 ¼ inches high. Cut a piece from your “Baby Border” print paper. I used the
blue lace border. Cut it to 4 3/8 inches and adhere it to your tag about 1 inch
down from the top of your tag. Now you can add your two squares to your tag. Punch
two cardstock circles and two paper washers. Glue one circle and one washer
together. Glue one each side at the top of your tag lining them up. Punch a
hole through the washer and feed some ribbons through the hole and tie them
with a knot. Add some photos to finish your tag.
2 nd Tag

Front Side
Cut a rectangle 4 ¾
inches x 8 inches out of your pink cardstock. Cut the left corner off your tag
using your eye. Place the cut piece on top of your tag in the right corner and
cut it to match. Use a corner rounder on
the bottom two corners.

Cut a rectangle 4 5/8 inches x 7 7/8 inches from the
“Cherished” print paper. You need to
make the print paper match the cardstock tag at the top. To do this, place the
print paper under your tag. Line your print up the top of the tag and the left
edge of the tag, trim along the corner to match. Move the print paper over to
the right edge of your tag, making sure it matches up at the top and side. Trim
the edge again. They should match your
tag.

Back Side


Find your piece of four borders from “Baby Border”, cut it
back to 4 5/8 inches wide and adhere it to your tag near the top. Find your strip
from “Baby Border” with the phrase Little Darling, cut one and mat it onto a
piece of pink cardstock. Add it to your tag partly on the border print paper. Cut a mat from your black cardstock, 3 ½
inches x 5 inches. Cut a second yellow mat, 3 3/4 inches x 5 1/4 inches. Adhere
the black mat to the yellow and add it to your tag. Find one of the small
frames and a stamp from our left over “New Arrivals”. Mat the stamp onto a
piece of yellow cardstock. Add the finished piece to the small frame. Add your
photo to the tag and adhere the small frame over the top. Punch two cardstock
circles and two paper washers. Glue one circle and one washer together. Glue
one each side at the top of your tag lining them up. Punch a hole through the
washer and feed some ribbons through the hole and tie them with a knot.
Tag 3

Front Side
Cut a rectangle 4 ½ inches x 5 ¾ inches from your yellow
cardstock. Cut the left corner off your tag using your eye. Place the cut piece
on top of your tag in the right corner and cut it to match. Use a corner
rounder on the bottom two corners.

Cut two pieces of “ Rock-a-Bye” print paper. They need to be
4 ¼ inches x 5 ½ inches. You need to
make the print papers match the cardstock tag at the top. To do this, place the
print paper under your tag. Line up the top of the tag and the left edge of the
tag, trim along the corner to match. Move the print paper over to the right
edge of your tag, making sure it matches up at the top and trim the edge
again. They should match.

Ink around the edge and adhere both of them to your cardstock
tag. Find your pink lace border and cut it to 9 inches. Adhere it to your tag
about 1 ¾ inches down from the top of your tag. Wrap the ends around to the
other side of the tag. Cut a black mat 3 ¾ x 3 ¾ inches, add a photo and adhere
it to your tag.
Back side

Use the middle of your larges frame, ink around the edges
and adhere it to your tag. Cut a photo mat from your black cardstock. It should
be 3 inches x 4 inches. Punch two cardstock circles and two paper washers. Glue
one circle and one washer together. Glue one each side at the top of your tag
lining them up. Punch a hole through the washer and feed some ribbons through
the hole and tie them with a knot.
Tag 4

Front side
Cut a rectangle 4 inches x 6 inches from your pink cardstock.
Cut the left corner off your tag using your eye. Place the cut piece on top of
your tag in the right corner and cut it to match. Use a corner rounder punch on
the bottom two corners.
Find your piece with
the four borders on it from your “Baby Border” print paper, cut it back to 5 ¾
inches wide. You need to make the print papers match the cardstock tag at the
top. To do this, place the print paper under your tag. Line up the top of the
tag and the left edge of the tag, trim along the corner to match. Move the
print paper over to the right edge of your tag, making sure it matches up at
the top and side, trim the edge again.
It should match. Ink around the edge and adhere it to your cardstock
tag. Cut a black cardstock mat to 3 inches x 4 inches. Add the mat and photo to
your tag. Find a stamp images from your “New Arrival” print paper, mat it onto
a piece of yellow cardstock and add it to your tag over your photo.

Back side
Cut a rectangle 3 inches high and 5 ½ inches long from your
“Little Treasure” print paper. Round the corner and make the other corner match
the tag. Find your leftover piece of border strip with the baby faces. You need
a piece about 4 faces long. Add it to your tag as shown. Cut a black mat 2 ½ inches x 3 ½ inches and
adhere it to your tag. Cut a piece from your “New Arrival”, it needs to be one
stamp wide and two stamps high. Mat it onto a piece of yellow card stock and
add it to your tag. Punch two cardstock circles and two paper washers. Glue one
circle and one washer together. Glue one each side at the top of your tag
lining them up. Punch a hole through the washer and feed some ribbons through
the hole and tie them with a knot. Add a chipboard word to finish your tag.
Tag 5
Front side

Cut a piece of black cardstock to 4 1/8 inches x 6 inches.
Cut a yellow mat 3 7/8 inches x 5 ¾ inches. Adhere it to the black card stock.
Add a photo to your mat and place a green frame over the top. Add a chipboard
word to finish your tag.
Back side

Cut a blue mat 3 7/8 inches x 5 ¾ inches. Adhere it to your
black card stock tag. Add a photo to your mat and place the blue frame over the
top. Find a left over piece of the print paper you used as a border around your
page. Add it to your tag as shown above. Punch out three hearts and add them to
your tag. Add a chipboard word to finish your tag.
When placing your tags in your pocket, please be careful of
the chipboard words that you don’t “catch” them. Don’t forget to add your
children’s names and ages along with some information.
thanks for looking
Hugs
Jane
PS don't forget that if you are wanting to make the book along with me, then Seriously Scrapbooking are selling kits on their online store. They have kits for page 1, page 2 and three ready to go. All kits come with instructions.


