.JPG)
Hello Everyone
Time to get in touch again, so much has been happening and all very very exciting, but I can't share it all with you just yet. But I do have some news I can share.

First up - Graphic 45 and 3L Scrapbook Adhesive are having a blog hop. I was on Graphic 45 and 3L Scrapbooking Adhesives designs team at the same time and I remember the blog hop being great fun. There is also giveaways on Graphic 45's blog and 3L's blog as well. I have add the links for you so you can check it out. To enter just visit the blogs and follow the instructions. Graphic 45 and 3L have all the links you need to their design team members taking part each day. Remember everyday there will be another group of designers who are sharing their projects.
Scrapbook Adhesives by 3L
Graphic 45's Blog
Both Graphic and Scrapbook Adhesives are world leaders in scrapbooking and have amazing designs team who dream up the most inspiring projects and share them with you.
Next up: Another couple of my favourite companies have teamed up.
Imaginarium Designs and Couture Creations are also doing a Blog Hop with giveaways.

You need to check this blog hop out as well, Imaginarium Designs is the chipboard company of my choice and I love all the designs and the quality of the chipboard. Couture Creations is another Aussie company who make lots of amazing products. I have the links for you here.
Imaginarium Designs
If you have not checked out Imaginarium Designs blog then please do, they have an amazing design team from all over the world and their design teams work is mind blowing.
Couture Creations
Remember you will need to check out each day to see what is happening and increase your chances of winning.
So make a cup of tea or coffee and take the time to visit, leave comments and go into the draw to win some wonderful prizes.
Now for something else.
I am going to share one of my favourite projects here on my blog over the next few weeks.
This was a project I did for Australian Scrapbook Ideas last year. I sold kits for it at
Seriously Scrapbooking and it was a huge hit, with everyone who made it loving it so much. I can't get all the papers anymore and we have run out of kits, so I am going to share it here and you can make it using some of Graphic 45's newer paper collections.
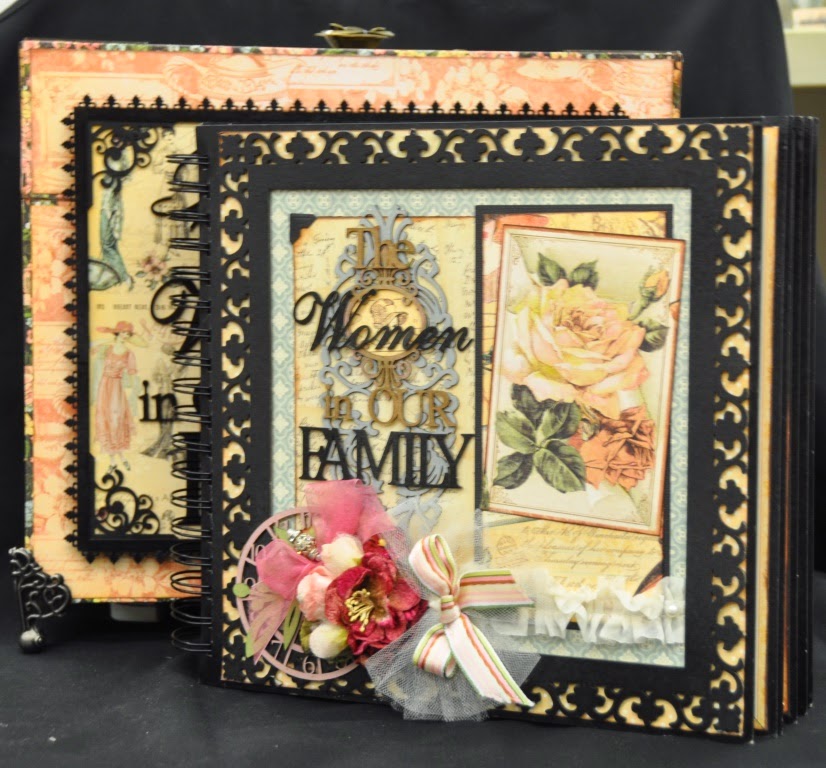
So starting today, I am going to share the instructions for making the cover. I used a Imaginarium Designs chipboard book. All the chipboard used in this project is from Imaginarium Designs, who also created a box for me to decorate and keep my book safe.
So a bit about the book.
This book is for the women in my family. I am starting with my Great Great Grandmothers, then my Great Grandmothers, Grandmothers, Mother and myself. I am also doing pages for my girls. This is going to be the pefect keepsake book, full of memories and photos along with ephemera. The book is full of pockets and flaps with lots of lovely layouts. You can adapt the pages and easily turn them into 12 x12 inch layouts.
Materials used
Graphic 45 Ladies Diary Collection:
Ladies Diary, Garden Stroll, Delicate Detail, Picture Perfect, Moment in Time.
Black
Cardstock
Miss Rose and Sister Violet Flowers
Vandoros Ribobns.
Versa colour inks in Cinnamon and Laurel leaf
Tim Holtz Distress inks in Vintage photo and Peeled Paint.
Adhesives and a hot glue gun.
Imaginarium
Designs: IDS006
Chipboard Shapes-Clock face 3 inch, IDFL0009
flourishes-Kerri flourish,IDT0011 Tinies –Brackets on oval frame short, IDFL0002
Flourish Oval, Imaginarium Designs -Frame and assorted words.
I will be using Graphic 45 papers from “A Ladies Diary” and
chipboard from Imaginarium Designs.
For your
cover of your chipboard book, I have designed it so you can make the whole cover then add it to the
front of your chipboard book once you have finished. You don’t need your
chipboard book just yet. You can make all the pages, add photos and place the
pages into your chipboard book in the order you want them rather than the order
I have made them.
You need to
cut all your papers and ink around the edges. I have used Tim Holtz Distress
Vintage Photo to ink all my edges.
You need to
cut your sheet of “Delicate Details” to 9 ¾ inches x 9 ¾ inches. Ink around the
edges with Tim Holtz Distress Vintage photo ink. You are to use the spot side. From your sheet
of “Garden Stroll cut a square 8 ½ inches x 8 ½ inches. Put adhesive all over
the back of this square and adhere it to the middle of your 9 ¾ inch x 9 ¾ inch
square.

Paint or spray your
frame black and glue it over the top of your “Garden stroll” square. You need
to be able to tuck some lace under your frame about an inch up from the bottom
of the inside of your frame. So don’t put any glue on the back of that part of
your frame. Make sure you get it on
straight. The frame is about the same size as your square of Delicate Details
print paper, so there is not much room for error.
Cut a piece
of black cardstock to 3 ½ x 7 ¼ inches. Cut a piece of “Picture Perfect” print
paper to 3 ¼ inches x 7 inches and adhere it to the black cardstock. Add it to
your “Garden Stroll”. It needs to go over the top of the right edge of your
“Moment in Time” piece. It should fit inside your frame with the same amount of
print showing all the way around.
From your
sheet of a “Ladies Diary” print paper. Cut out the large lady image. Leave a
little bit of cream showing all the way around.
Cut out the image of the rose which is in the square. Adhere it to your
“Picture Perfect” rectangle. You can place it on a slight angle if you wish.
Place some
tape across the middle of your cover. You will be putting your lace on top of
it. It needs to be about an inch up from the bottom inside of your fame. Tuck
the ends under your fame and add some more glue. Using foam
tape/squares, adhere your large lady image to your cover.
Now it is time to ink
your chipboard pieces. Ink your 3 inch clock pink. I used a versa cube Cinnamon.
For the Kerri flourish, you will need to ink it with peeled paint distress ink.
Add some more ink in a lighter shade around the edges. I used a versa cube in
Laurel leaf. Add a bit of glitter to the
flourish. Use the wires
from each flower and twist them together to form a posy. Tie some tulle in a
bow to the wire stems. Trim the ends back. Tie a bow in some ribbon and use a
glue gun to adhere it to the tulle bow. Glue your
clock down in the corner of your frame. Glue the Kerri flourish on top of your
clock. Use a glue gun and adhere the
flower posy to your cover.

Ink your
chipboard flourish oval with a versa cube in Laurel leaf. Add some glitter to
the flourish.
Spray/paint
the words “women” and “family” in blackInk your chipboard words, “The”, “in” and “Out” in Tim Holtz Distress vintage photo ink pad. Ink your oval frame in Vintage photo. Glue your inked chipboard oval flourish down to your cover. Glue the small oval frame on top of the flourish. Add your chipboard words “The women in our Family”
Thanks so much.
To purchase more of my kits visit Seriously Scrapbooking – on line store
www.seriouslyscrapbooking.net.au
I am planning to share a page each week with you including the box, so please leave me a comment and let me know what you think.
Hugs
Jane.